How to String a Viola
Changing the strings on your viola can be a daunting task. But rather than spending time and money getting a luthier to restring your instrument, you can replace them yourself with this step-by-step guide. Learning to restring a viola is a valuable skill. After stringing your viola a few times, you should be able to restring a string when you inevitably break one and be playing again in less than ten minutes. (Although you will need to be aware that the new string will stretch when you first start to play it).
- What Strings You Should Use
- How to String a Viola
- When Should You Change Your Viola Strings
- How Often Do Strings Need To Be Replaced
What Strings You Should Use
Before we get onto how to string your viola, it is important to choose appropriate viola strings. When you buy strings, buy ones that suit your level. There is little reason for a beginner to play on $100+ strings, but at the same time, you will not get the same sweetness of sound using very cheap, poor-quality strings.
When it comes to viola strings, you get what you pay for. Cheap strings will break more easily than more expensive strings. They also tend to stretch unreliably, causing the string to start to unravel soon after being put on the viola.
Have a look around for a brand of strings that suits you. Some strings are made out of catgut, which is an old term used for strings made of animal intestines. These days' catgut strings are usually made out of sheep or goat intestines rather than the actual intestines of a cat. Catgut strings are always well labelled and are usually quite expensive. If you do not feel comfortable using catgut strings, then there are definitely other good quality metal options available.
How to String a Viola
Make sure to restring strings one at a time. Restringing one at a time means you will never get confused about what string goes on what peg and you will have the other strung strings to look at as a guide.
Parts of the Viola You Need to Know

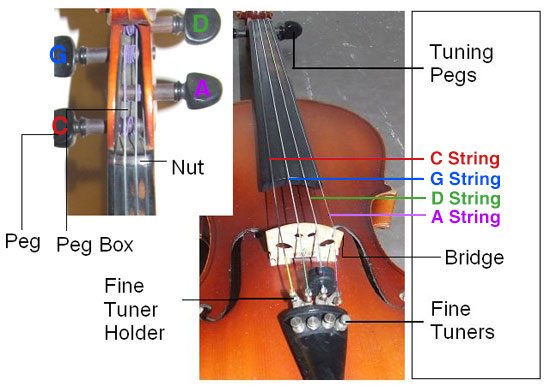
It is important that you know the names of the different parts of the viola that you will interact with when restringing your instrument. Have a close look at your viola - the nut (at the top of the viola under the peg box) and the bridge both have notches in them where the string rests to make sure the strings are evenly spaced. The tail piece has small arms attached to hold the ball end (or nub) of the string in place if there are fine tuners, otherwise there should be a slot attachment to slide the nub under directly on the tailpiece. On the peg you should notice a small hole for the string to be threaded through. These are all small but important parts of the viola that you will need to be familiar with so that you can restring your string without any unnecessary confusion.
Restringing Steps
Step 1 - Winding the Peg
First, unwind the fine tuner so it can be used once the string is attached. The fine tuner should be wound out to the point where it starts feeling loose, and then wound in a little so that it does not fall out.
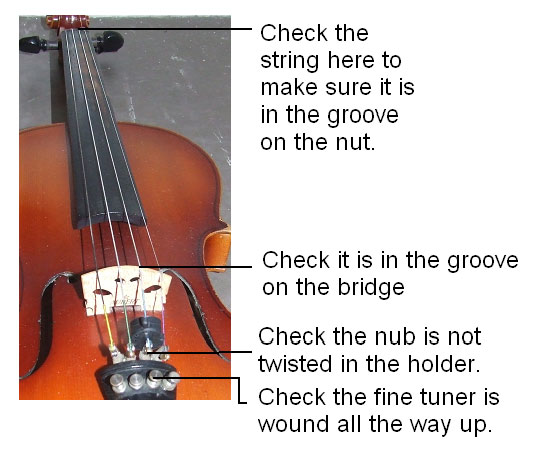
Place the nub (or ball end) of the string into the arms of the fine tuners or in the slot on the tailpiece, making sure the nub is the right way up - with the string coming over the top. Having the nub the other way round causes extra stress on the string and can bend the string and cause extra pressure on this part of the string, leading to breakages.
With the nub or ball end in the holder, it is time to focus on the peg end of the string. Bend the peg end of the string over about 1-2cm from the end of the string, so that it forms close to a right-angle. This will help you to thread the string through the hole in the peg, and will help the string to stay in the hole when you wind the peg. Thread the string though the hole in the peg, and turn the peg towards the scroll (top of the peg box) so that the hole that you threaded the string into is facing the scroll. This makes sure that the string is sitting in the peg securely enough to start winding without the string coming out.
With your hand pulling down gently on the string to maintain enough tension to ensure that the string is wound evenly, angle the string away from the peg (by holding the string towards the opposite side of the fingerboard to the side that the peg is on) and wind the string around the peg for 2 turns. The string should wind on the peg on the opposite side of the peg hole from where the head of the peg is. Then, cross the string over to the other side, (by angling the string towards the peg side of the fingerboard) and continue winding. The string should cross over the previous 2 coils and wind up on the peg side of the peg hole. There it should continue to wind neatly towards the peg. Keep winding until the string sits with enough tension to keep it in the tailpiece without having to hold it in place. We wind the string this way so that as the string loosens up, it has enough space to neatly wrap around the peg.
Are you finding it hard to turn the fine tuners, or to tighten your bow? Unwind the screws on fine tuners and remove the screw from its socket. Find a pencil, and rub the pencil lead up and down the threads of the screws. The graphite or lead from the pencil should build up a dust on the screw which will make it easier to turn!
Pegs can be equally as stubborn. The next time you change a string, take the peg out and rub it with chalk where it usually comes in to contact with the peg box. The chalk on this join between the peg and the peg box will make the peg easier to turn.
Step 2 - Checking the length of the String
Check the length of the string to make sure it is in the right place. Make sure you check the tailpiece end to make sure the nub is still sitting the right way, at the bridge to make sure the string is sitting in the right notch, and at the nut end of the string to make sure it is properly in place. Wind the string in until it is firmly in place, but still under the pitch of the note you need to tune your string to. This may not be very much! You may only need to turn the peg a quarter of a turn or so to get a reasonably firm tension on the string that is still under the required pitch of the open string that you will then have to tune up to.

Step 3 - Tuning the string
Note: You should take care to tune all of your strings once your new string has been tuned to the correct pitch as restringing a string can cause the other strings on your instrument to fall out of tune.
Use the peg to tune the string to as close to the note as possible, while still remaining slightly below the note. Then, use the fine tuners to adjust the note, as explained in the How to Tune the Viola article. If you do not have fine tuners then you will have to use the peg to tune to the correct note, being careful not to overstretch the string by tuning it higher than necessary.
Your newly strung string will stretch rapidly to start off with and it will need tightening at the peg often. This is because the fibres in the string stretch as the string is tightened. Play the string as much as you can over the next few days to get all the stretching and retuning out of the way so you can then play the string without constantly slipping out of tune. About an hour or so of solid playing should allow for most of the stretching to happen.
When Should You Change Your Viola Strings
You should replace strings as soon as they start to wear. A sign that your strings may be getting old is that they will start to unravel. Strings that unravel make the viola sound fuzzy and can also cause scratches in the fingerboard. Also old strings will lose their tone and will sound dull. If your strings are losing their resonance and playability especially while using vibrato then it is time for a new set of strings.
How Often Do Strings Need To Be Replaced
It varies how often you should change the strings on your viola according to how well you maintain it and how much you play. As a general rule if you play 1 to 2 hours a day you should restring your viola every 3 to 5 months. If you are a beginner and your lack of skill overshadows the quality of resonance your strings have then it is not as important to change them that frequently, but at least once a year. As you become better and are performing more, it is important to have the best tone as possible. Consider changing your strings a couple of days before a big performance, giving you a couple of days to break them in.


